Part 4: How to Enable Users to Edit Custom Page Content in WordPress
This is the fourth article in a five-part series about planning and implementing custom landing pages in WordPress. Each article is intended to be useful in its own right and applicable beyond landing pages, but taken together the series walks through the whole process of planning and implementing a custom landing page that integrates cleanly into a WordPress-powered web site. The resulting page will be easily editable with familiar forms in the WordPress admin system.
How to Enable Users to Edit Custom Page Content in WordPress
Coming Soon: How to Customize Menus and Title Text for Custom Pages in WordPress
Editable Content – What Makes a Template a Template
There are two significant advantages to using templates for web pages, whether in WordPress or otherwise: reuse and sensible separation of concerns.
Reuse: Templates allow the same designs to be used across multiple pages.
Separation of Concerns: With templates, people creating or managing content can benefit from high-quality design and development without having to be designers or developers themselves. They can be, but they don’t have to be.
In WordPress there are of course various types of content that can be made editable, but there are also multiple methods for doing so. For our landing pages we’ll allow our users to edit page content via standard page, featured image, and widget forms. To determine which method to use where we’ll take a content-first approach, first looking at what content needs to be editable then determining which method is most appropriate for each case.
Which content do we want to be editable?
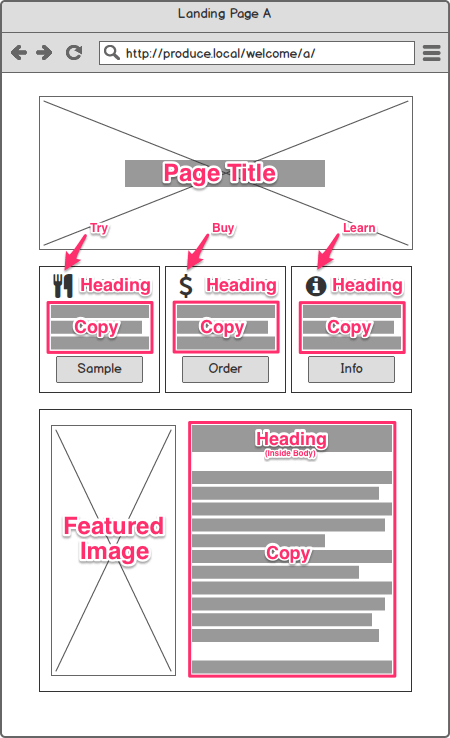
For the purposes of this exercise, let’s say we have been told that copywriters should be able to edit text and the main feature image, but the icons and buttons are being left to the front-end developers. Thus, the copywriters should only have to see the things they can change; they shouldn’t have to find what they need within markup that they might break.
Here’s a mockup showing the content we’ll need to make editable:
From a content perspective there are three general areas that need to be editable:
the page header – where our page title will be displayed
the calls to action – prompts and links for potential customers
the main content – further information for potential customers
So which parts of these sections should we make editable for our copywriters via those standard WordPress forms?
For our page header we’ll make the page title editable.
For our calls to action we’ll make the headings and copy editable.
For our main content we’ll make the body copy, its heading, and the featured image editable.
With our content in mind we can break down our implementation like so:
The page title, body copy, body copy heading, and featured image can all be made editable via various parts of the standard post form.
The headings and copy for the calls to action can be made editable via standard WordPress widgets.
Now that we know what content we need to make editable and how to go about it we can get started in earnest.
Our First Real Page Template
Enough jibber jabber. It’s time to create our first real page template. We’ll start simple with something very similar to our templates from the previous tutorial in this series. Let’s call this file something like landing-page-template-a.php and save it directly within our theme folder, which should itself be inside of wp-content/themes.
As you can see, I have included the beginnings of some body HTML for us to build upon as well as some comments to show where we’ll add the code to pull in our main text content, featured image, and customer options. None of that is actually required for WordPress, though; you can structure your page however you like.
Basic WordPress Template Functions
WordPress offers many, many functions to help you get your content onto pages and into posts through templates, but the first function calls you should add to your template are to wp_head() and wp_footer(). As their names suggest, they should be called from your HTML head element and the bottom of your body element respectively.
You may have noticed that those function names are nouns rather than verbs. That is common with WordPress, so be careful to not confuse functions for variables. You don’t need to print a return value from functions like wp_head() and wp_footer(). Just call them like so:
When you call wp_head() WordPress will automatically insert a title element for you, so go ahead and remove the hard-coded version from your HTML.
There are a few other WordPress functions that are particularly useful at the top of a template page: language_attributes(), bloginfo(), and body_class(). They are used like so:
An easy way to make the main heading editable is to simply use the title of a page or a post as its main heading. The WordPress function the_title() makes that very easy indeed:
Note that the_title() will print only the title text you enter when composing a page or a post, not anything extra such as the site name, which is often included in a page’s title element. Here, “title” corresponds to the content, not necessarily to the title of the HTML document.
Making the Main Content and Featured Image Editable
With the foundations of our template in place, we can now add the main WordPress loop like so:
That loop is special in WordPress: it allows you to use special functions to refer to page- or post-specific content.
OK, now for the main text content! Do you have a fresh cup of coffee and an hour to spare? Well, enjoy your spare 59 minutes then because showing the main content is as simple as this:
At this point, our template should be functional. Let’s create a test page to use it.
Start a new page (e.g., via New > Page in the WordPress Toolbar or Pages > Add New in the admin sidebar.
Type or paste a title and some body copy. The latter can include headings if you like.
Select a template in the “Page Attributes” box.
Click the “Publish” button.
Making the Customer Options Editable
Our non-technical users such as copywriters may want an easy way to edit the calls to action—the three options. We can give it to them with widgets. In this case, we’ll use the standard WordPress Text Widget.
Implementing standard widget support is as simple as calling the dynamic_sidebar() function with an identifying parameter—either an id integer or a name string. You can also check is_active_sidebar() first with the same parameter. We’ll use three strings as our identifying parameters:
lp-opt-set-1-try-section
lp-opt-set-1-buy-section
lp-opt-set-1-more-info-section
The name values are arbitrary, so feel free to use values that are meaningful for your template.
Widgets are managed through Appearance > Widgets or Live Preview. These standard WordPress features are well documented elsewhere, so we won’t cover them extensively here, but let’s look at how to associate the above identifiers with friendly names then take a look at the results.
Associations between widget identifiers and their various attributes are established through the use of the register_sidebar() function in functions.php. Let’s add a widget-initialization function to our functions.php file from How to Make a Child Theme for WordPress.
Although we have thus far kept our new page template PHP and HTML in a single file for the sake of simplicity in learning about templates, it is quite common and often desirable to store template source code across multiple PHP files. Doing so can enable conceptual separation as well as the ability to easily replace whole page sections.
For landing pages, being able to mix and match different headers, footers, sidebars, and other page areas can be especially important in delivering content variation for tailored campaigns and A/B testing. We won’t go into these options in this tutorial, but keep in mind that they are possible.
Structure Built, Time for Style!
Now that our template is fully functional it’s time to style it up. Since this tutorial is about producing a template, not designing the look of a page that will use that template, go ahead and apply whatever style rules you like in style.css. You can follow the example of the mockup if you like, but feel free to make it your own.
When you’re styling your template, don’t forget the icons! We used placeholder images from Placeholder.com, but you could easily use your own custom images or an icon font such as Font Awesome, which is what we used for the mockup.
Next in This Series
In the final article in this series, How to Customize Menus and Title Text for Custom Pages in WordPress, we’ll apply some finishing touches to how we present our templated pages, helping them look and rank their best.
From web design, CMS websites, applications, ecommerce, motion graphics and multimedia, graphic design, and print, to Internet marketing solutions, we’ve got you covered.
Get our latest news, insights, and project spotlights delivered directly to your inbox.
* We are the sole owners of the information collected on this site. We only have access to/collect information that you voluntarily give us via email or other direct contact from you. We will not sell or rent this information to anyone.


